How to Shave the Back of Your Neck by Yourself: The Complete Guide (2026)
You know the feeling. You leave the barber looking sharp, and within a week the back of your neck starts creeping back into fuzzy territory. That clean line disappears, and the whole haircut starts looking like it’s three weeks old instead of three days.
The back of the neck is the single fastest area to lose its shape after a haircut. Most men notice visible regrowth within five to seven days, and by week two, the neckline looks noticeably messy — even if the rest of the cut still holds up.
So why don’t more guys shave it themselves?
Because until recently, it was genuinely difficult to do well.
Why the Back of Your Neck Is So Hard to Shave Yourself
The back of your neck sits in a blind spot. You can’t see it directly. You can’t easily reach it with a standard razor. And the curved shape of the nape makes it hard to follow a consistent line — especially working in reverse through a mirror.
Most men who attempt it end up doing one (or all) of these:
• Holding a handheld mirror in one hand while shaving blind with the other
• Asking a partner, roommate, or family member for help
• Ignoring it entirely and waiting for the next haircut
• Using a neck template or stencil (which still requires mirror setup and both hands)
Each of these works to some degree, but none of them are fast, easy, or consistent enough to become a regular habit. That’s why the average man only cleans up his neckline a handful of times between cuts — if at all.
The 3 Methods for Shaving the Back of Your Neck at Home
Over the years, three distinct approaches have emerged. Here’s how each one works, what it’s best for, and where it falls short.
Method 1: The Two-Mirror Technique (Traditional)
This is the standard advice you’ll find in most grooming articles: set up two mirrors and work carefully.
What you need: - A large wall or vanity mirror - A handheld mirror (at least 5 inches wide) - A trimmer or razor - Good lighting - Shaving cream or gel (if using a blade)
How to do it:
1. Stand with your back facing the large wall mirror.
2. Hold the handheld mirror in front of you at chest level, angling it until you can see the back of your neck clearly in the reflection.
3. Comb your hair downward so it sits naturally.
4. Using your free hand, bring your trimmer or razor behind your head.
5. Start at the center of your neckline and shave downward in short strokes, following the line your barber set at your last haircut.
6. Work outward toward each ear, checking the mirror frequently.
7. Clean up any strays below the line.
Pros: You can see what you’re doing (sort of). No special tools required beyond a second mirror.
Cons: The reversed mirror image makes hand coordination confusing — your hand moves the opposite direction of what you see. It requires decent overhead lighting. You need one hand for the mirror, which means you’re shaving one-handed. The line is almost never as straight as what a barber gives you. Takes 8 to 15 minutes to do properly.
Best for: Men who already have a steady hand with clippers and are comfortable working in mirror-reverse.
Method 2: The Template / Stencil Method
Products like silicone neckline templates wrap around the back of your head and create a physical guide line you can shave along.
What you need: - A neckline template (silicone or rubber) - An elastic strap to hold it in place - A trimmer, clippers, or razor - A mirror (to position the template)
How to do it:
1. Place the template at the back of your neck at your desired neckline height.
2. Secure the elastic strap across your forehead, nose, or chin to hold it in place.
3. Use a mirror to confirm the template is level and positioned correctly.
4. Shave or trim everything below the template line.
5. Remove the template and check your work.
Pros: The physical guide helps prevent major mistakes. Good for men who want a very precise, straight line.
Cons: You still need a mirror to position the template correctly. The template can shift during shaving, especially if you sweat. It doesn’t follow the natural curve of your hairline — it forces a generic shape. Setup and positioning add time. You’re still shaving with one hand while checking the mirror.
Best for: Men who want a very defined, straight-edge neckline look and don’t mind extra setup time.
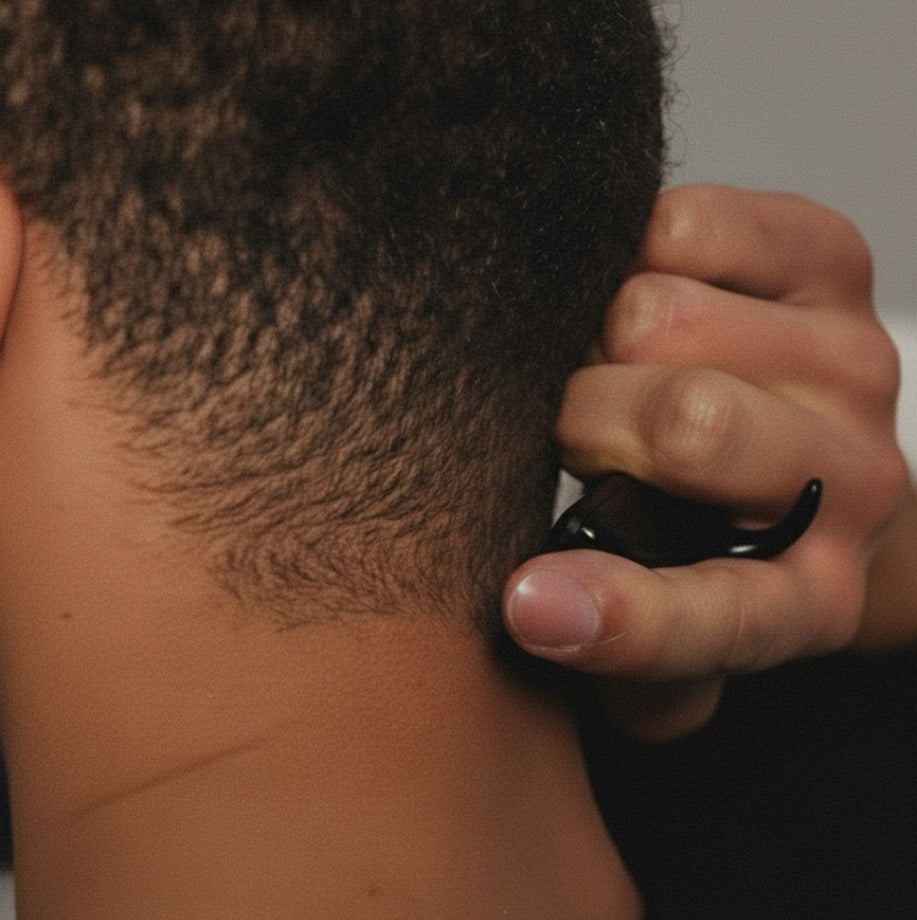
Method 3: The “Shave by Feel” Method (No Mirror Needed)
This is the newest approach, and it’s based on a simple observation: your fingers already know exactly where your neckline is.
Run your fingers along the back of your neck right now. You can feel exactly where the hair starts, where the line of your haircut sits, and where the bare skin begins. You don’t need to see it — your sense of touch maps it instantly.
The problem was never that men couldn’t feel their neckline. The problem was that no shaving tool let them act on that information. Standard razors and trimmers are designed to be guided by sight — they don’t translate touch into a clean line.
That changed with the development of razors designed specifically for shaving by feel — tools that sit between your fingers and move as a natural extension of your hand.
What you need: - A touch-guided neck razor (like the Gever Neck Shaver) - That’s it.
How to do it:
1. Grip the shaver between your fingers. Your thumb rests against an indentation above the blade, your middle finger hooks underneath, and your index finger rests on top.
2. Reach behind your head. Start at one ear.
3. Let your index finger lead. The tip of your index finger traces along your hairline — you can feel exactly where the hair meets the skin.
4. Your thumb follows the bottom of the neckline. It detects the edge from below while the blade sits between your guiding fingers.
5. Shave using smooth, downward strokes. Work from the ear down and across the neckline.
6. Repeat on the other side. The whole process takes about 60 seconds.
Pros: No mirrors needed at all. Both hands are free (no mirror to hold). Works entirely by touch, which is more accurate than reversed-mirror sight for most people. Extremely fast — under a minute. Becomes second nature after two or three uses. Follows the natural curve of YOUR neckline rather than imposing a generic shape.
Cons: Small learning curve on the first use (most men get comfortable by the second or third time). Only works with a tool specifically designed for this grip and technique.
Best for: Men who want speed and simplicity. Men who find the mirror method frustrating. Anyone who wants to make neckline cleanup a quick, regular habit rather than an occasional chore.
Which Method Should You Use?
Here’s a straightforward comparison:
|
Factor |
Two-Mirror |
Template |
Shave by Feel |
|
Time |
8–15 min |
5–10 min |
~60 seconds |
|
Mirror required |
Yes (two) |
Yes (one) |
No |
|
Learning curve |
Moderate |
Low-moderate |
Low (2–3 uses) |
|
Line accuracy |
Varies |
High (straight lines) |
High (natural lines) |
|
Follows natural hairline |
Somewhat |
No (generic shape) |
Yes |
|
Hands free for shaving |
One hand |
One hand |
Both hands |
|
Good for regular use |
Possible but slow |
Possible |
Ideal |
If you already have a two-mirror setup and you’re comfortable with it, there’s nothing wrong with continuing. But if you’ve ever wished cleaning up your neckline was as quick and thoughtless as brushing your teeth — the by-feel method is worth trying.
Before and After: What a Clean Neckline Actually Does
Most men underestimate how much the back of their neck affects their overall appearance. Here’s what changes when you keep it clean:
Your haircut looks fresh longer. The neckline is the first thing to grow out and the most visible sign of an aging haircut. Maintaining it adds an extra one to two weeks of life to every cut.
You look put together from every angle. People see the back of your head more than you think — in meetings, at restaurants, walking down the street. A clean neckline signals that you pay attention to the details.
You feel more confident. It’s a subtle thing, but knowing the back of your neck looks sharp changes how you carry yourself. It’s the same psychology as wearing a well-fitted shirt — even if nobody comments, you notice.
Post-Shave Care (All Methods)
Regardless of which method you choose, proper aftercare prevents irritation:
1. Rinse with cool water immediately after shaving to close pores.
2. Pat dry — don’t rub. The skin on the back of your neck is sensitive.
3. Apply an alcohol-free aftershave balm or moisturizer. Alcohol-based products will sting and dry out the skin.
4. Don’t shave over irritated skin. If you see redness, wait a day before your next cleanup.
How Often Should You Clean Up Your Neckline?
Most men get the best results cleaning up every five to seven days. This catches the regrowth before it becomes visibly messy, and it’s often enough to make the technique feel automatic.
If your hair grows particularly fast, every four to five days keeps things sharp. If it grows slowly or your hair is lighter in color, you might stretch it to ten days.
The key is consistency. A quick 60-second cleanup twice a week is far more effective than a lengthy session once a month.
The Bottom Line
Shaving the back of your neck by yourself used to be one of those grooming tasks that was more trouble than it was worth. Between the awkward mirrors, the reversed coordination, and the inevitable uneven lines, most guys just gave up and waited for the barber.
That’s changing. Whether you stick with the traditional mirror approach, use a template, or try the newer by-feel method, the goal is the same: make neckline maintenance simple enough that you actually do it regularly.
The men who look consistently well-groomed aren’t the ones with the most expensive haircuts. They’re the ones who maintain the details between visits.
Your neckline is the detail that matters most.


Leave a comment
This site is protected by hCaptcha and the hCaptcha Privacy Policy and Terms of Service apply.